


Impress your friends and family with these spooktacular Halloween brownies that are as delightful to look at as they are to eat. These boo-tiful Halloween mummy brownies are a lot of fun to make for the whole family and are a tasty addition to a Halloween party.

These Halloween mummy brownies are the perfect Halloween treat! They are chewy, gooey and delicious. I love serving them at Halloween parties for children and adults alike.
Top Questions
What is the difference between a brownie and a cake brownie?
Why do brownies have a skin top?
Are brownies better the next day?
Why do my brownies always turn out gooey?

Why you’ll love this Easy Halloween Brownies recipe
This is one of my favourite halloween dessert recipes. It’s simple and the decorated mummified topping is perfect for that spooky factor at this time of year.
Halloween brownies are so easy to make, it’s a simple chocolate brownie recipe with some fun spooky decoration.
You offer these Halloween chocolate brownies as a treat for any local trick-or-treaters. They always go down a treat!
Ingredients
For the full recipe and instructions scroll to the bottom of the page for the recipe card.
Cocoa Powder
The addition of cocoa powder is what takes the classic blondie recipe and transforms it into a rich chocolate brownie. You can adjust the amount the cocoa in the recipe to your liking – I like my brownies to be thick, rich and full of flavour.
White Chocolate
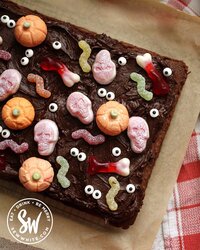
The melted white chocolate is an optional addition to this recipe, but it transforms your simple Halloween brownies into Halloween mummy brownies. The white chocolate is drizzled back and forth over the brownie to make it look light the wrapped bandages of an Egyptian mummy.
Edible Eyes
The finishing touch to your Halloween chocolate brownies are these edible eyes, which really bring your brownies to life.
How to make Easy Halloween Brownies – step by step
For the full recipe and instructions scroll to the bottom of the page for the recipe card.

Combine all your wet and dry ingredients until they’ve come together. Your batter will be thick and gloopy.

Bake until crisp on the top. If you like them extra gooey then reduce the time slightly. If you like them firmer, then add 2-4 minutes.


Once your brownies are cooled and sliced, it’s time to decorate!
Melt your white chocolate in the microwave and use it to stick the edible eyes to your brownies.


Now, drizzle the white chocolate back and forth over the brownies to make it look like a mummy.
Serve your Halloween brownies to friends and family!
Top Tips
It’s best to let your Halloween mummy brownies fully cool before you start decorating, otherwise, the white chocolate won’t harden on your brownies and it may run.
You can use the edible eyes to make different faces on your brownies, bringing their character to life!
Don’t forget to leave the centre of your brownie traybake a little gooey, that way you can enjoy both crispy pieces and chewy gooey ones.
Easy Halloween Brownies Serving Suggestions
These Halloween brownies are perfect as they are, the sweet white chocolate decoration really takes them to the next level.
Serve them at Halloween parties, to trick-or-treaters or just as a movie snack when you watch Hocus Pocus for the 100th time!

Equipment
This list contains affiliate links
- 9 inch x 12 inch cake tin(see notes for other size cake tins and cooking times below)
- Kitchen Scales
- Electric whisk
- Whisk
- Mixing bowl
- Greaseproof paper / Baking parchment
Substitutions and variations for Easy Halloween Brownies
Nuts
Adding crunchy nuts to this recipe is a great way to give some bones to your mummy! Throw in a handful of mixed nuts just before you bake your brownies. I suggest experiment with different nuts to find your favourite flavour combos.
Make Gluten-Free Halloween Brownies
Swap out your flour for a gluten-free alternative, either rice flour or almond flour works really well. Just be sure to check the quantities so your brownies don’t come out too cakey.
Add More Chocolate
In case you need even more chocolate in your Halloween chocolate brownies, try adding some chopped dark chocolate to the brownie mix or your favourite chocolate chips. These melt in the oven and make your brownies even gooier than before!
Stir in jam for a bloody look brownie
Stir some strawberry or raspberry jam into your brownie mix for that extra fear factor! When you cut into your brownie the red jam will ooze out to look like blood! It’s great for parties and the sweet jam goes really well with the dark chocolate brownies.
Storing Easy Halloween Brownies / Making ahead of time options
Brownies can be kept for about 5 days in the cupboard if kept in an air-tight container. I suggest letting the melted chocolate fully harden and then stacking your brownies, placing a sheet of parchment paper or kitchen roll between each layer.

Easy Halloween Brownies FAQS
What is the difference between a brownie and a cake brownie?
Normal brownies are chewy and gooey, thanks to the shorter cooking time in the oven. This means that they are soft moist and perfect when served warm. However if you over-mix your brownies or bake them for a little longer, they might come out cakey. Meaning the sponge is lighter and fluffy, like a cake.
Why do brownies have a skin top?
Brownies have a skin on top due to the mix of ingredients in the batter. The dissolved sugar makes for a shiny crackly top, caused by air bubbles rising up through your batter.
Are brownies better the next day?
I love brownies warm from the oven, but some people do say that brownies are better the next day as they have had time to rest and their chewy centre has fully developed.
Why do my brownies always turn out gooey?
Brownies turn out gooey when you bake them for a shorter amount of time. If you prefer thicker, more cake-like brownies, then all you have to do is leave them in the oven for a little longer.

Other Recipes you might like


Pumpkin Traybake Cake – Easy Halloween Pumpkin Cake
Easy Halloween Chocolate Cake
Pin this Easy Halloween Brownies recipe to enjoy later
Pin me for later or follow me @sewwhiteblog on Pinterest for my latest recipes and to discover my others.


Recipe

Easy Halloween Brownies
Equipment
- 9 inch x 12 inch cake tin (see notes for other size cake tins and cooking times below)
Ingredients
For the brownies
- 350 g (2 cups) Milk chocolate
- 250 g (1 cups) Unsalted butter
- 250 g (1 ¼ cups) Light brown sugar
- 3 large Eggs
- 1 tsp Vanilla extract
- 120 g (1 cups) plain flour / all purpose flour
Optional Extras
- 150 g (1 cup) nuts, dried fruit or chocolate chips
Halloween Mummy Decorations
- 200 g (1 ½ cups) white chocolate
- edible eyes
Instructions
- Pre-heat your oven to 160ºC Fan/ 180ºC/ 350F / Gas Mark 4 and grease and line your 9 inch by 12 inch tin with baking parchment/ greaseproof paper.
- Melt the chocolate and butter together in a pan on a low heat. Keep string to make sure it doesn't burn. When melted remove from the heat.350 g (2 cups) Milk chocolate, 250 g (1 cups) Unsalted butter
- Add the eggs, light brown soft sugar and vanilla extract into a bowl.250 g (1 ¼ cups) Light brown sugar, 3 large Eggs, 1 tsp Vanilla extract
- Whisk with a hand mixer for 5 minutes until thicker and paler in colour.
- Add the now slightly cooled chocolate and butter mix to the egg mixture. Keep whisking as you go.
- Sieve in the plain flour and using a hand whisk, whisk until the flour has been mixed in. Don't over-mix.120 g (1 cups) plain flour / all purpose flour


- (Gently mix in the optional nuts or chocolate chips at this point.)150 g (1 cup) nuts, dried fruit or chocolate chips
- Spoon the mixture into the cake tin and bake for 15-20 minutes. (see other cake tin-size cooking time in the notes below).
- Let the brownies cool in the tin.

Decorating the Halloween Mummy Brownies
- Remove the brownies from the tin and slice them into rectangles.
- Melt the white chocolate in short bursts in the microwave.200 g (1 ½ cups) white chocolate
- Use the melted chocolate to stick the eyes on the brownies.edible eyes

- Using a spoon or piping bag you can drizzle the white chocolate over the top to look like a mummy's bandages.

- Serve and enjoy!
Notes
- The brownies will last 2-3 days if you don’t eat them all in a few minutes.
- 9 inch square cake tine will need to bake for 25-30 minutes.
- 8 inch square cake tine will need to bake for 35-40 minutes. As the brownie will be thicker it will need more time than cooking a thinner brownie in the 9inch x 12inch tin.
Nutrition
Please note that the nutrition information provided above is approximate and meant as a guideline only.
So fun! Making these for the kiddos in our neighborhood for an upcoming Halloween party!
Oh my goodness. These are so adorable! I’m saving this to make with my kids!
Such a fun and festive idea to decorate brownies like this! It’s simple and cute and will be a hit at all the Halloween festivities!
My kids love this brownie recipe and the spooktacular decoration. I suspect they’ll bake this recipe more than once over the next month!
The recipe was absolutely delicious and a definite winner! My kids loved it! Thank you so much!
Truly amazing in taste and flavors in this recipe. Will definitely make again, very good recipe!
These are just too cute. I made your Reindeer Brownies for Christmas and they were so good. These are definitely going to be my Halloween treats.
So cute and I loved how simply they were to decorate. Some recipes you come across are so complex to decorate it puts me right off, these were perfect.
Absolutely love these!
These brownies were easy to make and delicious. Everyone enjoyed them. I plan on making for birthdays and holidays.